Garlic Prawns with Coconut Rice

I really love sauces with Coconut Milk, but they can be a bit heavy at times. So I tried something new and started this sauce of with a Roux. Not a big amount just enough to carry the sauce to a light, creamy, delicate deliciousness.  When the dinner is over you can pat your tummy and feel good without feeling heavy.

I really enjoyed this dish and have had a lot of requests for the recipe, so I really hope you all give it a go and don’t be afraid to cheat a little with coconut based sauces. Enjoy.

Garlic Prawns with Coconut Rice

  • 500 gr (1 lb.) Peeled Prawns or 1 kg (2 lbs.) Unpeeled
  • 2 small Spring Onions,
  • 4 – 5 Baby Corn, sliced at an angle, not too thick
  • ¼ bunch of fresh Chives, sliced
  • 1 tablespoon Margarine or butter
  • 2 teaspoons rounded Plain Flour
  • 3 to 4 small cloves Garlic, peeled, finely chopped
  • 1 425 gr (15 oz) Can Coconut Milk
  • 1 cup Water
  • ¾ teaspoon Turmeric
  • 2 -3 teaspoons Continental Chicken Stock Powder
  • 1 cup heaped, Uncooked Rice, washed
  • Salt to taste
  • ½ bunch Fresh Chives, finely chopped, extra

Check the prawns for any peels that might be hanging on. If buying unpeeled prawns; remove heads, peel and gut the prawns by removing the gastric tube along the back, make a shallow cut along the back and the gastric tube should be visible, remove.

Finely chop the peeled garlic; finely slice the ¼ bunch of chives.

In a heavy bottomed saucepan wash the rice 2 to 3 times; drain, then add 1 cup of coconut milk and 1 cup of water, add the ½ bunch of finely chopped chives, and salt to taste. Cover and put on medium high heat for 15 minutes, DO NOT lift the lid unless it’s not see through. When all the water has absorbed after 15 minutes and surface looks pitted remove from heat, keep covered and put timer on for another 15 minutes.

Meanwhile in a small frying pan, add the margarine and garlic, cook until fragrant and the garlic has started to brown on the edges, add the flour and cook until foamy, add some water and stir well until looking lumpy add more water and stir until smooth, continue adding water and stirring until the sauce is the thickness of thickened cream. Add the remainder of the coconut milk, turmeric, chicken stock powder, spring onions, baby corn, chives and prawns. Stir well, add salt to taste, you may need extra water, the sauce should be the thickness of pouring cream but no thinner..

When rice timer is over, fluff up the rice with a fork. Serve the Rice and Prawns.


Chicken and Pork Seasoning

Many times when I look at the ingredients of a packet of seasoning there are so many additives, some of the names I have to look up on the internet to figure out what on earth they mean. I get lost in all these Latin or technical names and often wish the used terms we all understood.

I was looking up Citric Acid last night to see how it was used in a can of beans, I found out more than I wanted and it was scary. If you eat too much citric acid it allows your body to absorb aluminium more easily, not good. But there is worse there is another citric acid and it is still just called citric acid but it is made from the black mould that grows on the citrus fruit. To me that is beyond nasty.

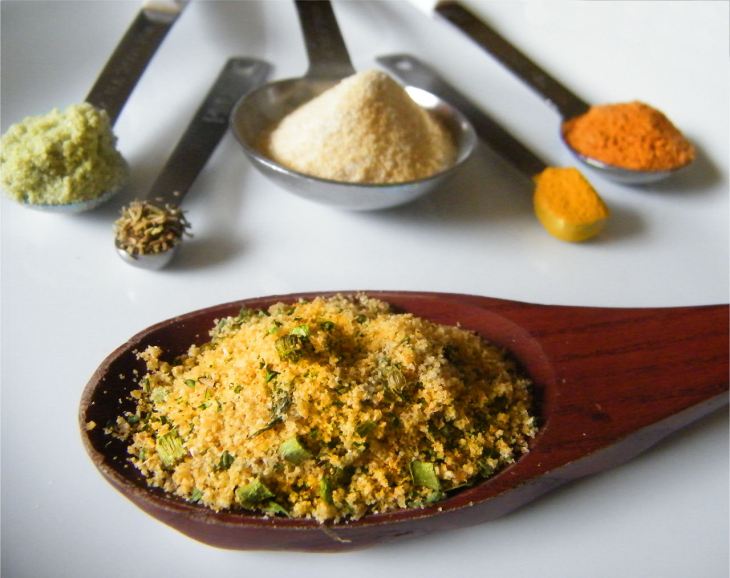
So now that I have digressed from the recipe and most probably grossed you out I created a seasoning that is delicious the main salt component is the Massel vegetable stock powder, if you want to use less salt to your food add less stock powder or use a low salt stock powder. It is a delicious seasoning great on pork and chicken.

Chicken Seasoning 1a

All herbs are dried unless stated otherwise

  • 2 ½ teaspoons Massel Vegetable Stock Powder
  • 2 teaspoons Parsley Flakes
  • ½ teaspoon Thyme leaves
  • 1/3 teaspoon Oregano Leaves
  • 2 ½ teaspoon Garlic Powder
  • 3 teaspoons Onion Powder
  • ½ teaspoon Turmeric Powder
  • 1 ½ teaspoons (level) Masterfoods All Purpose Seasoning
  • 2 teaspoons Chives
  • ½ teaspoon Sage Leaves
  • ¼ teaspoon Rosemary

Mix all ingredients together. Use liberally on chicken and pork for a deliciously flavoured roast or chops, sprinkle on pounded chicken breast before making schnitzels.

I made this seasoning and used it on a Spatchcocked chicken on the inside and outside, the result was incredible and had everyone’s mouth watering.

I hope you enjoy it as much as we all did.

*Note* – The Massel vegetable stock contains salt, I am using it as my salt substitute, plus delicious flavouring; if this is too salty add less or go for a salt reduced stock powder.


Italian Style Self Saucing Chicken

I think almost everyone has heard of self-saucing puddings, the delicious sweetness and full flavoured desserts. That we could never get enough of as kids.  Although now that I am older they seem almost too sweet for my taste buds.

But did get me thinking on how I could make a chicken that was full flavoured, rich without being over powering. Also while roasting add to the flavours with the juices and tastes of the chicken it self, to create a fresh, salsa or bolognaise like quality.

 I don’t know how many people are out there that get recipes when their resting or sleeping. It is not unusual for me to wake up after having dreamed of an amazing dish. This is what happened with this chicken dish. I made it just for the home once and it was an immediate hit. So after a little tweaking and perfecting here is the dish.

I hope you enjoy it as much as we all did.


Italian Chicken 8

  • 1.5 kg – 2.0 kg Whole Chicken
  • ¾ – 1 cup roughly chopped Mushrooms or chopped peeled Baby Potatoes if you don’t like Mushrooms
  • 1 medium Onion, peeled and roughly chopped
  • 3 Cloves Garlic, peeled and finely chopped
  • 1 Spring Onion, thinly sliced
  • 1 Large Char-grilled Capsicums (bell peppers) Sienna Brand Jar
  • 1 x 410 gram can (14.4 Ounces) Crushed Tomatoes including juice
  • Masterfoods All Purpose Seasoning to taste (or your favourite seasoning)
  • 1 teaspoon Sweet Paprika
  • ¼ teaspoon Dried Oregano
  • ¼ teaspoon Dried Thyme
  • ¼ teaspoon Dried Basil
  • 2 teaspoons Brown Sugar
  • ½ cup Water
  • 3 teaspoons Chicken Stock Powder (depending on sweetness and acidity of tomatoes, you might not need all of it)
  • Salt to taste
  • Oil and/or Butter

In a medium frying pan cook the onions and the garlic until fragrant and just starting to colour. Remove and set aside.

Drain the char-grilled capsicums, and roughly chop. Put aside with the onions.

Add a little oil or butter; add the mushrooms or the potatoes and brown to deep golden brown.  Add the onions back and capsicums, the herbs, 1 teaspoon sugar, water, tomatoes, spring onion, about ½ to 1 teaspoon salt or to taste. Cook on medium heat stirring often.

At this stage the sauce is going to taste sour and acidic, what you’re looking for is a sauce that has mellowed almost to a fresh bolognaise sauce quality but still nice and chunky. This will take about 20 minutes. After the first 10 minutes have passed add the second teaspoon of sugar and 2 teaspoons of chicken stock powder. Cook for another 10 minutes, taste. If necessary add another teaspoon of chicken stock powder and a little more salt to balance the sourness and acidity. The cooking time is an estimate as some cans of tomatoes are more or sometimes less sour or acidic.

In the mean time using a heavy bowl place the chicken neck side down and breast side up in the bowl. Lift the skin gently near the cavity and slide a tablespoon under the skin, rounded side up; move it around to loosen the skin. Push it toward the neck end; be gentle and careful that you don’t make a hole in the skin, also make sure you don’t push the spoon out the neck end. Repeat with the other side of the breast.

Season the chicken on the outside with the Masterfoods All Purpose Seasoning back and front on the inside of the thighs and wings.

Stir the sauce and taste it, if it tastes fragrant and mellow (like something you would pour over pasta) take off the heat. Bring the sauce near the chicken.

Using a clean spoon and making sure you do not touch the chicken with it (In case you want to eat leftover sauce).  Pull the skin out a little and spoon 2 – 3 tablespoons of the mixture into each side of the breast. Then fill the cavity with the mixture. Pat the mixture under the skin so it’s evenly distributed.

In a medium to large roasting pan make a mound of the mixture and place the chicken on top.

Roast for 35 minutes per 500 grams or per pound. I used a 2 kg (4lb) chicken that took 2 hours and 20 minutes; a 1.5 kg (3 lb) Chicken will take 1 hour and 45 minutes. On 170°C (340°F) Fan Forced, 180°C (350°F) Conventional Oven.

The skin is going to get quite dark by the time its finished but not burnt, if your worried turn the heat down just a fraction. When you serve the chicken there will be a lovely sauce all around the chicken and it’s really delicious.

Serve, I hope you enjoy it as much as we have.

The Kitchen Sink Cake


Last Christmas I was with my dad and sister when she mentioned that with our age now it is getting harder and harder to buy presents. So true, my dad is in his eighties and he has just about everything he has wanted except a tree that grows money instead of leaves, or is that my wish?  She thought it would be really nice if we  made things as gifts, they would come from the heart. I loved the idea. I started thinking of all the things I could make and just as soon sabotaged my ideas with what if they don’t like these things.

Her birthday was in the next month and I made her the Japanese Dredge (see Chicken in Japanese Dredge recipe). For my birthday she gave me Quick Bread in a Bottle, See recipe here  – http://www.sunset.com/food-wine/holidays-occasions/ – the cake was delicious and moist, but it would not take much to make it quite dry either.  I wondered if I could change it to make it luscious, and so came the idea of the Kitchen Sink it has just about everything but the kitchen sink lol.

The Kitchen Sink Cake

The Kitchen Sink 2a

  • 500 grams (1 lb) Self Raising Flour
  • 120 grams (4.2oz) Rolled Quick Oats
  • ¾ cup Brown sugar
  • ¾ cup Coffee Sugar (a large granular sugar)
  • ¾ teaspoon Cinnamon
  • 1 large Carrot, peeled and finely grated
  • 85 grams (2.9 oz) Butter
  • 4 eggs
  • 2 ½ cups Milk (room temperature) + 1 tablespoon White Vinegar (let stand 30 minutes)
  • 1 teaspoon Bicarbonate of Soda (Baking Soda)
  • ½ teaspoon Salt (Optional)
  • ¾ cup Milk Chocolate Chips
  • ¼ cup Flaked Almonds
  • ½ cup Currants
  • ½ cup Chopped Walnuts

In a medium bowl pour the milk and vinegar, stir well, let stand 30 minutes.

In a small bowl place the butter, melt in microwave or saucepan. Keep aside.

Break the eggs into the milk and beat with a fork, slowly add the melted butter and continue beaten until it looks well mixed.

In a large bowl add all the dry ingredients; add the milk mixture, stir well with a wooden spoon.

Grease and flour a large bunt pan, the chocolate can make it stick to the pan. Pour all the mixture into the pan, no more than 1 ½ – 2 inches from the top. Smooth top of cake batter. Place into oven at 180° C (350° F) for Conventional ovens, or 170° C (325° C) for Fan Forced Ovens, for 55 minutes. Cake is cooked when skewer comes out clean but sticky.


Chicken in a Japanese Style Dredge

Chicken In Japanese Dredge

Ingredients:

  • 1 kg (2 lbs.) Chicken Thigh Fillets
  • 2 cups Rice Flour
  • 2 cups Cornflour or Cornstarch
  • 2 tablespoons Garlic Powder
  • 2 tablespoons Onion Powder
  • 2 tablespoons Dried Chives
  • 2 tablespoons Dried Parsley
  • 2 tablespoons (well rounded) Paprika
  • 3/4 teaspoon Dried Thyme Leaves
  • 3/4 teaspoon Dried Oregano Leaves
  • 3/4 teaspoon Dried Sage Leaves
  • 1 1/2 tablespoons Masterfoods All Purpose Seasoning (or an All purpose seasoning you like)
  • 1 tablespoon GFresh Brand Yeeros Seasoning
  • 1 1/2 teaspoons Turmeric Powder
  • 4 -5 Eggs, beaten
  • 1 1/2 – 2 cups Plain Flour
  • 1/2 – 3/4 cup Water or Milk
  • 1 Large Freezer Bag or Zip Lock Bag
  • Oil for Deep or Shallow Frying

In a large bowl combine the rice flour and cornflour, add all the other herbs and seasoning, mix through thoroughly. Put aside for the moment. This rice flour mixture is more than what you need for this recipe, you can put the unused portion in an air tight jar and use later.

Fold the Bag down so the top of the bag is nice and clean, add the plain flour. Place the bag aside for now.

Remove any visible fat from the chicken and also slice any very thick parts and open it out to make it even thickness with the rest of the fillet. Repeat with the rest of the chicken. Sometimes I like to sprinkle a little Masterfoods All Purpose Seasoning on one side of the chicken.

In one bowl that is big enough to take the fillets add the beaten eggs. In an oval bowl or long bowl long enough to lay the fillets down add a cup full of the rice flour mixture.  Place a few fillets into the plastic bag with the plain flour, unfold and blow air into the bag then holding it closed tightly shake it about to coat the chicken with flour. Next dip the fillets into the beaten egg and then straight into the rice flour mixture. Cover the fillets with the rice flour and press down on the fillets, when you no longer have the beaten egg coming through, then you have enough rice flour mixture on the fillets. Repeat with all the fillets.

Heat oil in a deep fryer, you don’t want it too hot as you want to cook the chicken through. Add a couple of fillets at a time, don’t over crowd.  When cooking the fillets the coating goes through a soft stage and then a crispy stage, do not take the fillets out until they are crispy and be gentle when turning. Drain on absorbant kitchen paper.

Serve with vegetables or chips and a good gravy.


Salt

Most of us use salt in everyday cooking or to add to foods on the table. People have used salt for time immemorial, to preserve fish or meat which in turn then flavoured the meal from the salt remaining on the fish or meat after rinsing. Salt has even been used to preserve some vegetables, edible flowers like capers, and fruits like lemons. Vegetables are mostly preserved in a salty pickle like brine.

A lot of the foods that we eat that has salt in it are processed foods, and some foods have staggering amounts of salt in them. Did you know for instance that Coca Cola has 45mg of salt per can; I know that doesn’t sound huge but what if you drink a lot of coke per day, let’s say 6 cans that’s 270mg of salt 12% of your salt intake per day.

For instance and I found this depressing lol for breakfast I didn’t have any coke but lets just say I had a can of Coke that’s 45mgs salt,  with 2 slices of bread the average is 172mgs of salt so that’s 344 mgs salt, on that I had Flora Margarine 59mgs of salt, Virginian Ham yum 295 mgs salt for 30 grams I guess that’s about 2 slices, and last was some Kefalograviera cheese with 240mgs salt which sums up my breakfast alone to 743mgs of salt. That is a great deal. Considering I read that a daily intake should be 2,300mgs of salt which seems like a huge amount to me. Doing this was a real eye opener because I always thought that I don’t use a great deal of salt not even in my cooking but when you look at the hidden salts you don’t think about its kind of scary isn’t it.

There are many different types of salt too. Refined Salt (Table Salt), Murray River pink salt, Rock Salt, Sea Salt, Kosher Salt, Fleur De Sel and Himalayan pink salt.

We always used to buy the ordinary table salt as I grew up and bought it as I was older and in my old place. I really didn’t know that much difference from one salt to the other. Watching cooking shows you see Chefs use different salts and some even tell you why they prefer this salt.

When my health declined I found that the salt I was using had an effect on the level of pain I was in. We never used a lot of salt but it all adds up, I started going over to Saxa’s Lite Salt, which really helped and I was getting less pain. But I haven’t seen it in stores anymore so I researched online about salt and found that the Himalayan pink salt is antibacterial and antifungal in nature. Himalayan pink salt is naturally rich in iodine, where as it is added in Table salt.

Himalayan Pink Salt does contain small amounts of calcium, iron, potassium and magnesium. It also contains slightly lower amounts of sodium than regular salt. https://authoritynutrition.com/different-types-of-salt/

I bought course Himalayan Pink salt so I could grind it and control the amount coming out of it. I found that the amount of pain in my hands and feet have lessened considerably since using the pink salt which is wonderful. I get enough pain from nerve damage and I don’t need additional pain.

I was always curious about Kosher Salt as so many chefs use it. I knew it had something to do with the Jewish religion so after reading about it I found this.

Kosher salt is called “kosher” because it is useful for the Jewish religion.

Jewish law requires blood to be extracted from meat before it is eaten. Kosher salt has a flaky, coarse structure that is particularly efficient at extracting the blood. https://authoritynutrition.com/different-types-of-salt/

The other good thing is that Kosher Salt doesn’t contain, or used to not contain Anti-caking additives but there is a Kosher salt available now that does contain it. But I don’t know if it contains added Iodine or not.

There are so many more different salts out there and basically whether you want to pay a fortune for luxury salt or just stick with what you know, no matter what you put on your foods you need to be mindful of how much salt is in your diet, and also all the salt that is in the food that you buy.

Christmas Dinner

I had to ask my sister and dad what we used to eat for Christmas Dinner when we were young, I just couldn’t remember. Thankfully they remembered beautifully. Thank you Irene and Daddy.

When my sister and I were kids we had Roast Goose for dinner with Servietten Klosse, these are a dumpling made from breadcrumbs and stale rolls with herbs, eggs, spices and cooked, (Steamed or Boiled) in a Cotton Serviette. When served they are covered with lashings of delicious gravy. I just love roast goose, if you roast it on a rack to let the juices and fat drip out its a wonderful meat to eat with a great deal of flavour and crispy skin yumm.

As we got older we had Turkey Breast roast, served with dumplings or boiled potatoes and luscious gravy mmm. I do love a truly great gravy, it really does add to the moistness and flavour of the meat don’t you think?

Now that I live in the suburbs I often make a rolled turkey breast that I make myself by taking the breast off a 4.5 or 6.0 turkey. I butterfly it and season it adding either dried fruit like cranberries, apricots, dried apples, thyme, orange rind, salt and brown sugar. Then I trussed it and injected the centre where the dried fruit was with water to keep the turkey juicy. I also injected a 50/50 mixture of olive oil and water under the skin. Roasted it with a dish underneath to catch the wonderful roasting juices that would be made into gravy. Often we made boiled potatoes and browned some onions that we poured over the drained potatoes, it makes a huge difference in the flavour and what a great way of spiffing up ordinary boiled potatoes.

I would really like to know from all of you out there what you used to do as kids, or what you do now to celebrate this special season. But if you don’t celebrate Christmas please join in and tell us of your special Holidays and what you prepare for them.

Liver Love It or Hate It

When I grew up we often had liver to eat, it was very cheap and provided a decent sized dinner. Mum used to dredge it in flour with some herbs and spices then fry it until it was cooked, this was served with boiled potatoes and gravy. At that age I really didn’t like liver too much it was tough, dry and not pleasant in my eyes.  This all happened in the 60’s when people used to eat all these offal products, these days not many people talk about it so much. But just like fashion all things come around again. I have seen Pork Liver in the butchers recently so maybe liver is slowly coming back.

Gram for gram, liver is one of the most nutrient dense foods available to us. It contains a large amount of high-quality protein, an easily absorbed form of iron, all of the B vitamins (including B12 and folic acid in significant amounts), balanced quantities of vitamin A, many trace elements and minerals including copper, zinc, chromium, phosphorous and selenium, essential fatty acids EPA, DHA and AA, as well as the powerful antioxidant CoQ10.  Taken from the following blog :- http://blog.radiantlifecatalog.com/bid/60772/Benefits-of-Eating-Liver-10-Questions-Answered

As I have grown older I have seen liver made in many different ways. But my eyes were truly opened when I was invited to a friends place for dinner and watched the mom prepare Lamb Fry (Lamb Liver), she skinned it and I didn’t have any idea there was a skin on liver in the first place, she sliced it very thin and dredged it in flour, but here is the amazing thing. Before she started the liver she chopped up and fried 250 grams of bacon rashers and a large onion, then put them aside. She fried the liver and told me that it must not be cooked through, That is done when you make up the gravy add the bacon and onions and the liver and cook it on low for 30 minutes or so. Serve with potatoes and any other vegetables. I must say it was fantastic, there was absolutely no taste of the liver, never in my wildest dreams did I think I would love liver and I have repeated that recipe many times since. So I guess I can honestly say I love liver.

Potato Bake

potato-bake

I bought some Olga’s Veal Schnitzels already crumbed, normally I don’t like buying already made schnitzels as too many times I bought some that were very fatty, or had a lot of tendons, you just cannot see what is under those crumbs. So I buy veal, pork, chicken breast or beef and make my own schnitzels and know what meat has been used. I can also add the seasonings and herbs that I want to use and make it special.

Anyway, I made the schnitzels and they were ok, and instead of boiled or mashed potatoes I wanted to make a potato bake with some lovely flavours of bacon, fried onions and fresh sliced spring onion for lightness and freshness. I am lactose intolerant so I used the Liddells brand of lactose free cheese, it is a lovely cheddar cheese without the pain. I used a small dish about 10 inches x 5 inches. Recipe below.

  • 5 above medium Potatoes, peeled and quartered
  • 2 Spring Onions, finely sliced, reserve a little for garnish
  • 250 grams (8oz) finely diced Bacon, reserve a little for garnish
  • 1 Large Onion, peeled and chopped
  • 250 grams (8oz) cheese, grated
  • Salt to taste

Rinse the Potatoes, cover with water and salt to taste, bring them to the boil, cook until just done. Drain.

Meanwhile fry the bacon until golden and crisp, drain from the fat and put on paper towels. Fry the onions until golden and fragrant. Drain on paper towels.

Slice the potatoes to 1/4 to 1/3 of an inch thick. Make the first layer of the Potato Bake potatoes, I don’t grease my dish as you have ingredient that have been cooked in oil they will still exude some oil as well as the cheese. After the potatoes add a scattered layer of bacon, onions, spring onions just a few, and then some cheese. Keep this going until you used all the potatoes finishing with cheese. Place in oven and brown the cheese until golden brown. Garnish and serve.

Roasting Quails

I was delighted to see quails for sale at BananaBlue. Immediately my mind was creating all kinds of cooking ideas and side dishes, I thought baby vegetables or a Leek and Barley Risotto would go well with the quail. I decided on the baby vegetables. I chose Broccolini, Baby Carrots, and Young Leeks. I cut out some potato rounds with a cookie cutter, I wanted to keep with the delicate vegetable theme. With the leeks, remove the roots and only a tiny sliver of the connective base, this way it holds together when you cook it. I have added the recipe below.

It is amazing how much meat there is on the quails breast, you don’t expect it when you eat it, the preparing is a little fiddly at first, but once you figured out the first one the others are much easier.

I bought a different pepper grinder that contains a medley of black, white, pink and green whole pepper corns, it’s a milder more pleasant taste I think personally. I also use a salt grinder with pink Himalayan salt, I have to watch my salt intake as it gives me a lot of pain in my feet if I eat too much maybe it affects the neuropathy I am not sure, but anyway this salt because it’s a grinder I can control the amount that comes out so much easier and it’s a really nice tasting salt.

I also used the streaky end of the bacon rasher, it is just the right width to go over the quail I chose to use kitchen twine to hold the bacon in place, I didn’t want to puncture the flesh of the quail and have all the juices run out, it would be terrible if it turned out dry. Being such a small bird its surprising that it still takes about 35 to 40 minutes to cook but the flesh is a little denser than chicken.

Oh and for heaven’s sake don’t feed the bones to your pets they are so thin they would snap into sharp ends, and that would be horrible.Anyway, enough prattling on from me, here is the recipe.

Roast Quail

roast-quail-3a

  • 4 Whole Quails
  • 4 Pieces of Bacon
  • Freshly Ground Salt and Pepper
  • 4 Sprigs of fresh Thyme or a small pinch of dried Thyme for each bird
  • Kitchen Twine
  • Tooth Picks


Rinse the Quails under cold water; check the bottom opening is clean of feathers, fat. Dry well with paper towel inside and out, shake a little salt into the cavity.

Put the thyme into the cavity. Grind salt and pepper over the quail to taste, front and back.

With a long string tie the legs together at the end of the bone. Then bring the string under the wing, flip the bird over onto the breast and tie the string across the back.  This pulls the legs up so they are partly protected by the bacon.

Lay the bacon across the breast secure with tooth picks or with more kitchen twine.

Place on a wire rack over an oven tray. Roast for 35 to 40 minutes on 190C (375F) or until the juices run clear from thickest part of breast.

Serve with baby vegetables peeled and halved lengthways, cooked in salted water for 10 minutes, drained and sautéed in butter until starting to colour. Serve.